Showing posts with label howto. Show all posts

HOWTO Create a Readable PostScript or Pdf File out of a Man Page

I find myself often reading man pages of unix programs to be able to use the installed software more efficiently. That is one of the reasons I prefer to use a lightweight installation of "real" distribution instead of some tiny distributions that leave all the unncessary files like documentation out of the system to save some megabytes.

The standard output of man is unfortunately not very pleasant to read. But as man pages are written in a typesetting language called groff and processed through the groff engine, the same source can be used to produce a highly readable PostScript file. All you need to do is to use man with the following options instead of the ordinary man command:

man -Tps man > man.ps

This produces a PostScript file man.ps out of the man page for man. You can either use your favourite viewer for viewing the PostScript file, print it out to a printer, or convert it with ps2pdf to a pdf file, if you prefer a pdf.

ps2pdf man.ps

The following screenshot shows man page man as a pdf file, viewed with xpdf.

HOWTO Read rtf Files in Linux Console

Today I continue where I finished yesterday. I have so far written about reading doc and pdf files in Linux command line. Today I turn to rich text format, that is the files with extension rtf. Rtf is a very common format used by those who are at least slightly familiar with the compatibility problems caused by using Word's binary file format. Also rtf can be viewed using lightweight tools, it is not necessary to use OpenOffice.org to read the file.

I was reminded by my reader Reidar about catdoc, yet another Linux tool for reading windows file formats. As I don't have MS Word installed on any of my computers, I used Abiword for writing a short text (in fact this blog posting!) and saved it as a rich text file. And I was not disappointed by catdoc. It printed the content of my file on screen just like cat would do with an ordinary plain text file. You might be able to find it in the repositories of your distribution.

Catdoc is a tool that doesn't attempt to analyze and reproduce file formatting. It just extracts readable text from the file. What it can do, is to handle all versions of Word and convert character encodings. It can also read RTF files and convert Excel and PowerPoint files. You should install it in any system running on an old computer.


I thought that there are no console editors that can edit rich text files. I was not even sure whether it such editors would make any sense. But as I knew that Emacs can do everything one might some day need to do with her computer, I decided to google for "Emacs rtf". Surprisingly, or maybe not, there actually is an Emacs extension for editing rich text files and VIM should be able to edit rtf files out of the box. We are living in a strange world, aren't we?

HOWTO Read PDF Files in Console

I wrote about using Antiword for reading .doc files on the commandline yesterday. I think I get at least as oft pdf (portable document format) files attached to emails as I get .doc files. There are, of course, several alternatives for viewing pdf files when one is using X windows. You can, for example, use Evince, Kpdf or Xpdf for viewing the omnipresent pdf files.

I happen to read my email through a ssh connection on an Unix or sometimes a Linux system of my university. In order to view a pdf file, I have to save the attached file and use sftp to download the file to my desktop if I want to read it using a graphical pdf viewer.

Fortunately, there is a command line alternative even for reading pdf files! These can of course be used not only in a remote system over a ssh connection, but in any lightweight Linux system, even with a system with no X installed.


Ps2ascii uses Ghostscript for the conversion. It can convert both PostScript and PDF to ASCII text. It does not produce perfectly formatted output, but is certainly good enough for a quick & dirty conversion to have a glance at the textual content of a pdf file as the screenshot of Debian Reference shows.

HOWTO Read .doc Files in Console

We all receive .doc files attached to our emails. Sometimes we just have to read them, no matter how much we despise documents written with MS Word, or people who use MS Word.

There are several alternative solutions for the task. One, and probably the easiest solution, is to use OpenOffice.org Writer for reading documents produced with MS Word. A lighter solution would be to use Abiword. If you are using KDE, you could try Kword for opening the file. All of the mentioned word processors can pretty well import documents in .doc format.


Very often, all I need from a document is its textual information. It does not matter for me what is the used font and how well or poorly the document has been formatted. In this case, I usually do not bother to open a word processor just to read a document. All I need is a command line application, antiword. Antiword has been ported to a wide selection of operating systems ranging from DOS to Amiga. So it does not surprise at all, that it is available also for Linux. Use your distributions package management application for installing it.

Antiword is able to convert Word documents to plain text, to PostScript, to PDF and to XML/DocBook. My needs are more modest, plain text is all I need.

Antiword is a command line tool. Thus, all I need to convert this text from antiword.doc to plain text and read it through a pager is:

antiword antiword.doc | less


I can't imagine a simpler solution to this problem caused by the widespread use of proprietary binary file formats. Unfortunately the latest version of Antiword dates from 2005. It does not yet convert files written in the latest 2007 incarnation of the binary bloat.

A Short IceWM Tutorial

If you want to use a lightweight Linux system on your old computer, you have to use a lightweight window manager. IceWM is one of my favourite lightweight window managers. It does not reserve a lot of system resources and it can be used even with very old computers. It depends only on the X window system and libXpm. It should run even on an 386 or any other imaginable box that can run X. It is included in the repositories of every major distribution, so you should encounter no problems in installing it through the default package manager, either apt-get, yum, zypper or any other imaginable tool.

In addition to Linux, it can be used on several other flavours of Unix including commercial systems like Tru64 and AIX and open source operating systems like FreeBSD and NetBSD. It has even been reported to compile and run under Windows!

IceWM uses themes to change the look and feeling of the window manager. Themes consist of things like fonts, colours, borders and button pixmaps put together under a name to form a theme. The theme can be changed from IceWM's menu under the item Settings. The theme will be stored in the file ~/.icewm/theme. Changing the theme from the Themes menu overwrites the content of the file with the new theme automatically

Find a theme to install

Your IceWM probably came with some themes. Usually even more of themes can be installed through the package management as a separate package.

I prefer to choose myself the themes to be installed. There are two especially good web sites to go hunting for a ready theme to spice up your desktop:


* Freshmeat
* Box-look

It can even be configured to look like Windows XP if you try to build a desktop for those who are afraid of Linux.


Unzip the package

The themes are compressed packages and they must be uncompressed before use.

First check the package is OK:

tar -tzvf win31theme-default.tar.gz

This allows you to check the contents of the package before really unzipping it. If everything seems to be OK unzip the file with:

tar -xvf win31theme-default.tar.gz

This unzips the package in a directory called win31.

Put it somewhere where IceWM finds it
If you want to use the theme only for yourself (or if there are no other users), you should move the theme to the directory ~/.icewm/themes/themename. After this, you should find the just installed theme under the menu item Settings -> Themes

Themes usable by everyone are stored (at least in my system) in /usr/share/icewm/themes/

Tweak the menu
I don't like the default menu offered by the distribution I use. Probably you won't be perfectly happy with your menu either. This is where the going gets tough, as we will actually edit a text file to configure IceWM's menu.

Fortunately, it uses syntax that is simple to understand. First copy the default menu from /etc/icewm/menu to ~/.icewm/menu. If you absolutely do not want to configure any text files, you can try the programs IceMC or MenuMaker to edit the menu. I find it easier to configure the menu with Emacs (or some other editor).

The items in menu file start with a keyword, either prog or separator. Programs are defined using the syntax:

prog Program Icon app -and -options

We can, for example, add Firefox by adding the following line to menu:

prog Firefox firefox firefox

The first Firefox is the entry added to the menu, the second firefox is the name of the icon and the third firefox is the name of the binary.

If you want to insert a sub menu, it can be done by adding:

menu SubMenu folder _icon {
prog ...
prog ...
}

It is a good idea to think twice about programs one adds to the start menu and toolbar as the choice of lightweight software is as important for the user experience as the chosen window manager. I usually try to use lightweight alternatives to better known applications, for example, Abiword instead of OpenOffice.Org and PCManFM instead of Nautlilus, Konqueror or Dolphin. But you are of course free to do whatever you want!


Toolbar
You can add start buttons to toolbar using the same syntax as for adding applications to start menu. Use ~/.icewm/toolbar for your personal toolbar.

Preferences
The preferences are read from file preferences. Copy the default preferences from /etc/icewm/preferences to ~/.icewem/preferences. Use this copy of preferences file for storing your personal preferences.

The preference file is well documented. Just browse through the options presented in the file.
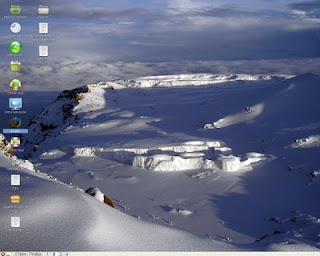
Icons on the Desktop
I am not sure whether having icons on the desktop is a good habit or if they just make the desktop more cumbersome to use. Most people, however, seem to want icons on their desktop where they are hidden behind windows and difficult to find.

IceWM does not support icons out of the box but there are several applications that can provide the desired result. One of them is idesk. I decided to use PCManFM for icons and wallpaper (Edit, Preferences, Manage the desktop and show file icons).

Startup script

It is not especially practical to set the wallpaper by hand using the command line every time one starts IceWM. If you want to execute certain applications every time you start IceWM, you can write a startup script (~/.icewm/startup). Here is a simple sample script:

---------------- ---------------- ----------------
#!/bin/bash
#
xterm -geometry 100x20+10+600 & # start a terminal
pcmanfm & # start the file manager
---------------- ---------------- ----------------

Remember to make your startup script executable with:
chmod a+x startup

As the result of these steps, you have a simple and strong lightweight desktop that is tailored to your needs. Later you can add even more lightweight functionality to your customised desktop and make it truly unique. If you already now have some ideas just drop a line in the comment box!

How to Boot Linux CDs on an Old Computer

One of the most common problems when installing Linux on an old computer is caused by their inability to boot from a CD drive. For example, my old Pentium 100 with 40 mb RAM can well be used with several Linux distributions. Only the installation might cause a small headache for some people, as the computer cannot boot from the CD.

There are at least three solutions to this problem.

The first one is to find an updated version of BIOS for your motherboard. It might allow booting from CD drive and thus solve the problem.

The second one is to use a distribution that still offers boot floppies. Most modern distributions rely on using a bootable live CD for installation. These suck for installation on an old computer as they usually cannot boot from CD and they don't have enough RAM to run an installer based on a live system. At least Debian and Slackware still offer floppies that can be used for getting the installation start.

If the old computer is connected to network, I would suggest installing the system over ftp. If you cannot install over network, you still need a CD for installation. At least my old Pentium has difficulties in reading rewritable CD-ROMs. If yours cannot read the installation CD, try to write another on a CD-ROM, not on a rewritable CD-RW.

The third solution is using Smart Boot Manager for booting the computer. Smart Boot Manager allows you then to continue booting from your CD drive.

I have used both the second and third solution for installing several distros on my Toshiba Satellite 200 that does not have a working network connection. Thus I need a distribution that has a reasonable collection of packages available on a small set of CDs. In practice this has meant the first three CDs of Debian or the full set of Slackware on three CDs.

You can download the image file for Smart Boot Manager floppy disk from here. After downloading the image, you have to make a boot floppy from it. For this, you need to use the command dd:
dd if=sbm.img of=/dev/fd0

The syntax of dd is not very easy to remember unless one understands that the option if is shorthand for input file and of for output file. Thus the command above writes the image file sbm.img to device fd0 (floppy drive).

After writing the image to a floppy, boot the computer with Smart Boot Manager in the floppy drive. SBM allows you to continue booting the operating system from either hard disk or CD drive. Now you are ready to continue installation from the bootable CD.